Lesson 26: Depth Testing
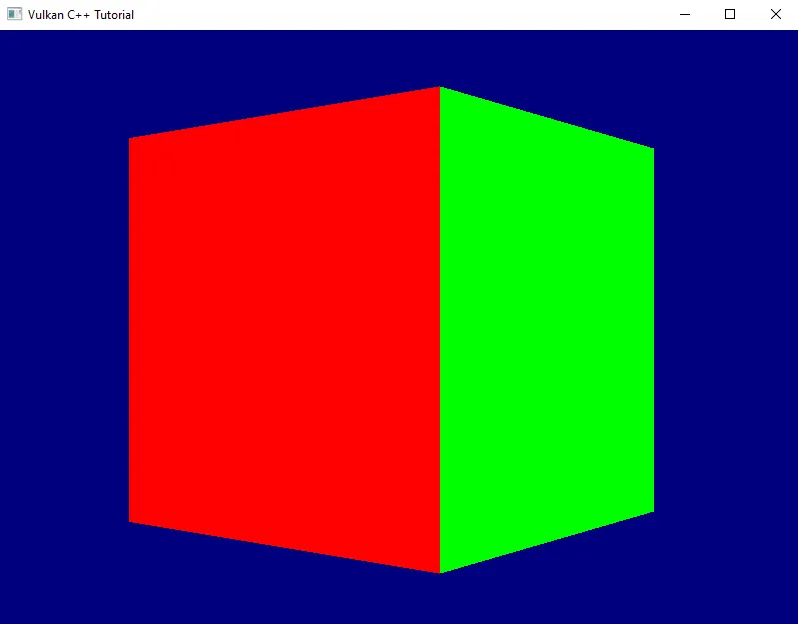
Many of you have probably already spotted the problem that makes our rotating cube look so weird: we did not yet enable depth testing. Our pipeline just renders the geometry in the order in which it is coming in and does not care which triangle is actually closer to the camera. The result is that the red front face is rendered first, but because it is covered completely by all the other faces which are rendered afterwards we never get to see it. For the same reason the top and bottom faces are always completely visible - they are rendered last on top of everything else.
So let’s go and fix this. The first thing to do is to enable depth-testing in the pipeline. To do so we need to create a PipelineDepthStencilStateCreateInfo and pass it to our GraphicsPipelineCreateInfo.
PipelineDepthStencilStateCreateInfo looks like this:
struct PipelineDepthStencilStateCreateInfo{ ... PipelineDepthStencilStateCreateInfo& setFlags( vk::PipelineDepthStencilStateCreateFlags flags_ ); PipelineDepthStencilStateCreateInfo& setDepthTestEnable( vk::Bool32 depthTestEnable_ ); PipelineDepthStencilStateCreateInfo& setDepthWriteEnable( vk::Bool32 depthWriteEnable_ ); PipelineDepthStencilStateCreateInfo& setDepthCompareOp( vk::CompareOp depthCompareOp_ ); PipelineDepthStencilStateCreateInfo& setDepthBoundsTestEnable( vk::Bool32 depthBoundsTestEnable_ ); PipelineDepthStencilStateCreateInfo& setMinDepthBounds( float minDepthBounds_ ); PipelineDepthStencilStateCreateInfo& setMaxDepthBounds( float maxDepthBounds_ ); PipelineDepthStencilStateCreateInfo& setStencilTestEnable( vk::Bool32 stencilTestEnable_ ); PipelineDepthStencilStateCreateInfo& setFront( const vk::StencilOpState& front_ ); PipelineDepthStencilStateCreateInfo& setBack( const vk::StencilOpState& back_ ); ...};- once more we can ignore the
flags_because there are none defined setDepthTestEnableenables / disables the actual depth test itself, i.e. the comparison between the new fragment and the value that is currently in the depth buffer for that fragment coordinate. Fragments that fail this test are not processed any further.setDepthWriteEnablespecifies whether the new depth value is actually written to the depth buffer. In most cases you’ll want to set this to true1.setDepthCompareOpallows you to specify the function that is used for comparing the new depth value with the old one. In most cases this will beCompareOp::eLessbut there might be situations where a different comparison is required.setDepthBoundsTestEnablespecifies if the depth values are tested also againstminDepthBounds_andmaxDepthBounds_and are discarded if they’re outside of this range.- stencil testing, which you can activate with
setStencilTestEnable, is a technique that allows you to only render certain portions of the scene. Insofar it is similar to the scissor operation (see lesson 16), but much more powerful. Essentially this looks at the stencil value for this fragment in the buffer and discards the fragment if a certain condition for that value is not met. setFrontandsetBackare related to the stencil test. We won’t use that feature for now, therefore we can ignore those two functions (their parameter is a bit more involved, so I don’t want to go into that here).
Alright, let’s enable depth testing for our pipeline:
auto createGraphicsPipeline(    const vk::Device& logicalDevice,    const vk::PipelineLayout& pipelineLayout,    const vk::ShaderModule& vertexShader,    const vk::ShaderModule& fragmentShader,    const vk::RenderPass& renderPass,    const vk::Extent2D& viewportExtent,    std::span< const vk::Format > vertexFormats) -> vk::UniquePipeline{    ...    const auto depthStencilState = vk::PipelineDepthStencilStateCreateInfo{}        .setDepthTestEnable( true )        .setDepthWriteEnable( true )        .setDepthCompareOp( vk::CompareOp::eLess )        .setDepthBoundsTestEnable( false )        .setStencilTestEnable( false );
    const auto pipelineCreateInfo = vk::GraphicsPipelineCreateInfo{}        .setStages( shaderStageInfos )        .setPVertexInputState( &vertexInputState )        .setPInputAssemblyState( &inputAssemblyState )        .setPViewportState( &viewportState )        .setPRasterizationState( &rasterizationState )        .setPMultisampleState( &multisampleState )        .setPDepthStencilState( &depthStencilState )        .setPColorBlendState( &colorBlendState )        .setLayout( pipelineLayout )        .setRenderPass( renderPass );    ...}
That is of course not enough. A depth test needs somewhere to store and compare against the depth values. Storing a depth value per fragment isn’t really different than creating a grayscale image, so Vulkan uses an image attachment to store the depth values. We did not create one so far though, let’s change that.
The depth format will appear in several places (the render pass, the depth image, and the depth image view), so let’s introduce a single named constant for it in presentation.hpp:
namespace vcpp{ constexpr auto depthFormat = vk::Format::eD32Sfloat; ...}We only need one float value per fragment, hence the eD32Sfloat2 - the S here stands for signed. With that in place we can extend the render pass:
auto createRenderPass(    const vk::Device& logicalDevice,    vk::Format colorFormat) -> vk::UniqueRenderPass{    ...    const auto depthAttachment = vk::AttachmentDescription{}        .setFormat( depthFormat )        .setSamples( vk::SampleCountFlagBits::e1 )        .setLoadOp( vk::AttachmentLoadOp::eClear )        .setStoreOp( vk::AttachmentStoreOp::eDontCare )        .setStencilLoadOp( vk::AttachmentLoadOp::eDontCare )        .setStencilStoreOp( vk::AttachmentStoreOp::eDontCare )        .setInitialLayout( vk::ImageLayout::eUndefined )        .setFinalLayout( vk::ImageLayout::eDepthStencilAttachmentOptimal );
    const auto depthAttachmentRef = vk::AttachmentReference{}        .setAttachment( 1 )        .setLayout( vk::ImageLayout::eDepthStencilAttachmentOptimal );
    const auto attachments = std::array< vk::AttachmentDescription, 2 >{ colorAttachment, depthAttachment };
    const auto subpass = vk::SubpassDescription{}        .setPipelineBindPoint( vk::PipelineBindPoint::eGraphics )        .setColorAttachments( colorAttachmentRef )        .setPDepthStencilAttachment( &depthAttachmentRef );
    const auto renderPassCreateInfo = vk::RenderPassCreateInfo{}        .setAttachments( attachments )        .setSubpasses( subpass );    ...}
We’ve talked about attachments and subpasses quite a bit back in lesson 17. The relevant changes for a depth attachment are the format and the final layout. Everything else is the same as for the color attachment.
Running this version yields an exception and a validation error:
... VkFramebufferCreateInfo attachmentCount of 1 does not match attachmentCount of 2 of VkRenderPass ...Of course. Our pipeline now expects the framebuffer to come with a depth attachment, which of course it doesn’t have yet. Let’s fix that by pretending we already have one depth image view per swapchain image that we could pass to the framebuffer creation function:
auto createFramebuffers(    const vk::Device& logicalDevice,    const std::vector< vk::UniqueImageView >& imageViews,    const std::vector< vk::UniqueImageView >& depthImageViews,    const vk::Extent2D& imageExtent,    const vk::RenderPass& renderPass) -> std::vector< vk::UniqueFramebuffer >{    std::vector< vk::UniqueFramebuffer > result;    for( std::size_t i = 0; i < imageViews.size(); ++i )    {        const std::array< vk::ImageView, 2 > attachments = { *imageViews[ i ], *depthImageViews[ i ] };        const auto frameBufferCreateInfo = vk::FramebufferCreateInfo{}            .setRenderPass( renderPass )            .setAttachments( attachments )            .setWidth( imageExtent.width )            .setHeight( imageExtent.height )            .setLayers( 1 );
        result.push_back( logicalDevice.createFramebufferUnique( frameBufferCreateInfo ) );    }
    return result;}
We give every framebuffer its own depth image and image view, just like each one already has its own color image view. Since we already have synchronized access to the color image views in our loop, we don’t need to worry about synchronization issues here.
So far, so good, unfortunately we don’t have any depth image views yet. Where do we get those from? The imageViews for the rendering output are members of our Swapchain class, so it seems logical that it also owns the depth images. However, while the former are created for us by the SwapchainKHR class we will have to do it ourselves for the depth images. The logical device gives us what we need:
class Device{ ... UniqueImage createImageUnique( const ImageCreateInfo& createInfo, ... ) const; ...};… with
struct ImageCreateInfo{ ... ImageCreateInfo& setFlags( vk::ImageCreateFlags flags_ ); ImageCreateInfo& setImageType( vk::ImageType imageType_ ); ImageCreateInfo& setFormat( vk::Format format_ ); ImageCreateInfo& setExtent( const vk::Extent3D& extent_ ); ImageCreateInfo& setMipLevels( uint32_t mipLevels_ ); ImageCreateInfo& setArrayLayers( uint32_t arrayLayers_ ); ImageCreateInfo& setSamples( vk::SampleCountFlagBits samples_ ); ImageCreateInfo& setTiling( vk::ImageTiling tiling_ ); ImageCreateInfo& setUsage( vk::ImageUsageFlags usage_ ); ImageCreateInfo& setSharingMode( vk::SharingMode sharingMode_ ); ImageCreateInfo& setQueueFamilyIndices( const container_t<const uint32_t>& queueFamilyIndices_ ); ImageCreateInfo& setInitialLayout( vk::ImageLayout initialLayout_ ); ...}Wow, not that easy, given that we just would like to have an image. Anyway, let’s unpack:
- there are actually quite a number of
ImageCreateFlagsdefined. However, we don’t need any of them yet. - the
imageType_specifies whether we want to create a 1d, 2d or 3d image - the
Formatparameter should be familiar by now. For the depth image we obviously should use the same format that we specified for our attachment above - the
extent_defines the dimensions of the image to create. It’s a 3D extent so that the same function can cover all use cases (Vulkan is a C interface, so there are no overloads possible), we can just set the 3rd dimension to 1 - the
mipLevels_parameter relates to a technique called mip mapping. I won’t go into details here, suffice it to say that it uses the same image in different resolutions to mitigate rendering artefacts when a textured object is further away from the camera. We don’t use this technique yet, so we can set this parameter to 1. - we talked about
arrayLayersback in lesson 18. We’re still not going to use this technique here, so we set this parameter to 1 as well samples_is again the number of multisample fragments rendered for each pixel on screen.- the
tilingparameter controls the internal layout of the image data in GPU memory. We don’t have any special requirements here, so we just useeOptimal. usage_specifies how we intend to use this image in the pipeline.- the
sharingMode_specifies whether the image is going to be used by multiple queues - the
queueFamilyIndices_are only relevant in cases where the image is going to be shared between queues, i.e. where the sharing mode iseConcurrent initialLayout- just as for the attachment descriptions - specifies the initial layout that this image will have.
With that knowledge, let’s create a first version of our depth image creation:
auto createDepthImage( const vk::Device& logicalDevice, const vk::Extent2D& imageExtent) -> vk::UniqueImage{ const auto createInfo = vk::ImageCreateInfo{} .setImageType( vk::ImageType::e2D ) .setFormat( depthFormat ) .setExtent( vk::Extent3D{ imageExtent.width, imageExtent.height, 1 } ) .setMipLevels( 1 ) .setArrayLayers( 1 ) .setSamples( vk::SampleCountFlagBits::e1 ) .setTiling( vk::ImageTiling::eOptimal ) .setUsage( vk::ImageUsageFlagBits::eDepthStencilAttachment ) .setSharingMode( vk::SharingMode::eExclusive ) .setInitialLayout( vk::ImageLayout::eUndefined ); return logicalDevice.createImageUnique( createInfo );}We’re not done here though. Remember how it wasn’t enough to create a vk::Buffer but instead we needed to explicitly allocate the memory for it? We need to do exactly the same here. Let’s create a struct similar to GPUBuffer but for images:
struct GPUImage{ vk::UniqueImage image; vk::UniqueDeviceMemory memory;};… and expand our createDepthImage function to also allocate the memory:
auto createDepthImage(    const vk::PhysicalDevice& physicalDevice,    const vk::Device& logicalDevice,    const vk::Extent2D& imageExtent) -> GPUImage{    const auto createInfo = ...    auto image = logicalDevice.createImageUnique( createInfo );
    const auto memoryRequirements = logicalDevice.getImageMemoryRequirements( *image );    const auto memoryProperties = physicalDevice.getMemoryProperties();
    const auto memoryIndex = vcpp::findSuitableMemoryIndex(        memoryProperties,        memoryRequirements.memoryTypeBits,        vk::MemoryPropertyFlagBits::eDeviceLocal );
    const auto allocateInfo = vk::MemoryAllocateInfo{}        .setAllocationSize( memoryRequirements.size )        .setMemoryTypeIndex( memoryIndex );
    auto memory = logicalDevice.allocateMemoryUnique( allocateInfo );    logicalDevice.bindImageMemory( *image, *memory, 0u );
    return { std::move( image ), std::move( memory ) };}
With that function we can create the images, but createFramebuffers needs ImageViews. Well, that shouldn’t be too hard, we already have the createImageView helper. The problem is that this function currently has the ImageAspectFlags hardcoded to eColor. We need to set a flag of eDepth, so we need to expose that parameter:
auto createImageView( const vk::Device& logicalDevice, const vk::Image& image, const vk::Format& format, const vk::ImageAspectFlags flags = vk::ImageAspectFlagBits::eColor) -> vk::UniqueImageView{ const auto subresourceRange = vk::ImageSubresourceRange{} .setAspectMask( flags ) ...}As said above, the swapchain should own the depth images and their image views and pass them on to the framebuffer creation. Since we want one depth image per swapchain image, we wrap createDepthImage and createImageView in two small helpers that build a std::vector each - one depth image (and view) for every entry in m_imageViews:
auto createDepthImages(    const vk::PhysicalDevice& physicalDevice,    const vk::Device& logicalDevice,    const vk::Extent2D& imageExtent,    std::size_t count) -> std::vector< GPUImage >{    std::vector< GPUImage > result;    result.reserve( count );    for( std::size_t i = 0; i < count; ++i )        result.push_back( createDepthImage( physicalDevice, logicalDevice, imageExtent ) );
    return result;}
auto createDepthImageViews(    const vk::Device& logicalDevice,    const std::vector< GPUImage >& depthImages) -> std::vector< vk::UniqueImageView >{    std::vector< vk::UniqueImageView > result;    result.reserve( depthImages.size() );    for( const auto& depthImage : depthImages )    {        result.push_back( createImageView(            logicalDevice,            *depthImage.image,            depthFormat,            vk::ImageAspectFlagBits::eDepth        ) );    }
    return result;}
Now we need to adjust the Swapchain constructor a bit to actually create them. Note that since m_framebuffers needs the depth image views, we have to make sure that the depth image and view members are declared (and therefore initialized) before m_framebuffers in the class definition:
Swapchain::Swapchain( const vk::PhysicalDevice& physicalDevice, const vk::Device& logicalDevice, const vk::RenderPass& renderPass, const vk::SurfaceKHR& surface, const vk::SurfaceFormatKHR& surfaceFormat, const vk::Extent2D& imageExtent, std::uint32_t maxFramesInFlight, std::uint32_t requestedSwapchainImageCount) : m_logicalDevice{ logicalDevice } , m_swapchain{ createSwapchainInternal( logicalDevice, surface, surfaceFormat, imageExtent, requestedSwapchainImageCount ) } , m_imageViews{ createSwapchainImageViews( logicalDevice, *m_swapchain, surfaceFormat.format ) } , m_depthImages{ createDepthImages( physicalDevice, logicalDevice, imageExtent, m_imageViews.size() ) } , m_depthImageViews{ createDepthImageViews( logicalDevice, m_depthImages ) } , m_framebuffers{ createFramebuffers( logicalDevice, m_imageViews, m_depthImageViews, imageExtent, renderPass ) }{ ...}Obviously we need to adjust the constructor call in main accordingly as well. This version compiles, but it doesn’t render anything and we get a lot of validation errors:
... VkRenderPassBeginInfo struct has a clearValueCount of 1 but there must be at least 2 entries in pClearValues array to account for the highest index attachment in VkRenderPass ...Once again the fact that Vulkan really only does what we ask it to do bites us: we have created a depth attachment for our render pass, but we didn’t specify a clear value for that attachment. That means that the depth buffer contains arbitrary garbage and so the depth testing cannot work properly. The solution is luckily trivial: we already specify a clear value for the color attachment, so we just need to extend that code a bit:
auto recordCommandBuffer( const vk::CommandBuffer& commandBuffer, const vk::Pipeline& pipeline, const vk::RenderPass& renderPass, const vk::Framebuffer& frameBuffer, const vk::Extent2D& renderExtent, const vk::Buffer& vertexBuffer, std::uint32_t vertexCount) -> void{ const auto clearValues = std::array< vk::ClearValue, 2 >{ vk::ClearValue{}.setColor( std::array< float, 4 >{ { 0.f, 0.f, .5f, 1.f } } ), vk::ClearValue{}.setDepthStencil( vk::ClearDepthStencilValue{ 1.f, 0 } ) }; ...}And now we see a correctly rendered rotating cube on screen. Yay!
Before I finish, an apology: last time I promised to also improve the render loop. However, it turned out that this lesson is long enough already. Therefore the improvement will have to wait until next time.
Footnotes
Section titled “Footnotes”-
Note that if depth writing is enabled, the depth values will be calculated and written to the depth image even if you disable the actual testing. This can be useful for certain special effects. ↩
-
Strictly speaking this format might not be available on all hardware, so in a real-world application you probably should design for some more flexibility. ↩